Sunday, October 22, 2017

Bad Boy Bobbie

I've have a rule with modelling which has been working well up until now. That rule is that I complete a project before I start something new, well that's the idea and it mostly works. And as we all know, rules are made to be broken. I've mostly finished the louvre vans which need to get a final coat of colour (grey is a colour?), fix the roofs to the bodies, decals and some weathering.

Semi Louvre MLV

King Post BLV

Queen Post BLV

36ft MLV

LV

Milk LV

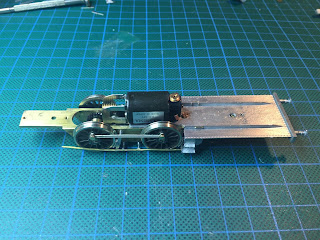
And because I couldn't wait, I decided to start build in an Ezi-Kits M40 Tank engine. Bad boy Bobbie!!. I've made some modifications including replacing the North Yard gearbox with a Highlevel Slimliner 54:1 gearbox which sits lower in the frames allowing me to fit a cab to the engine. Also, thanks to Craig W, I was alerted to the fact that the front footplate appeared too long. So a quick perusal of the GA plan (Thanks Greg E) showed that Craig was right, the footplate was 6" too long so this was reduced in length. Also added was the frames behind the front bogie as a well as a brass Z19 brass chimney, thanks Tom P!!. There are still some final details to add and then DCC and sound. The speaker will be in the bunker under the coal space with a keep alive hopefully fitting there as well. The Tsunami will fit in the smoke box (just). That's it for now and I won't start anything else, promise!! And thanks to all the guys for their help and advice, its what really makes this hobby even more enjoyable. Cheers.

The beginning

High Level Gearbox

Cab Interior

Front Bogie with frame insert
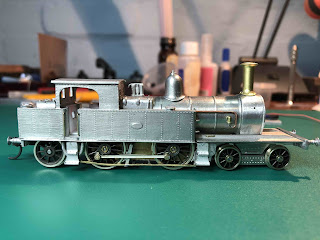
Getting there

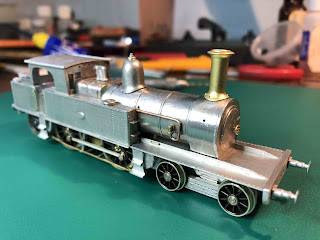
With replacement brass Z19 Chimney. Thanks Tom P!!

Sunday, August 6, 2017

Back on the Tools

I've turned my attentions back to making carriages again as I tried (in vain) to get some models finished for the Early Days Convention back on 22/7. I still took some along of what I'd been doing with some MLV's but didn't take any of the Milk LV's I'd been working on.
So here's where we're at with my Louvre Van Fleet. Firstly, I couldn't live with the dodgy 36ft MLV's that I'd cobbled together out of Berg's LV's so these were scrapped saving the ends and sides. I decided to makes some masters out of the Bergs LV's and create a proper 36ft MLV side. This seemed to work ok but I need to refine my casting skills as I had to make about 16 sides to get enough decent castings to make 3 wagons. Not a good success rate but it was still worth it as I have 3 reasonably accurate 36ft MLVs. Everything is scratch built bar the ends, couplers, buffers, bogies, and brake cylinder.


36ft MLV

Still working on the Roof

With the left over sides, I decided to make them back into LV's again but this time as Milk LV's with the lower panels opened out. I had enough bits left over to make 3 LV's, waste not want not!! Yes, it would have been easier just to buy the RTR version but where's the fun in that? So, I opened out the panels with a Jeweler's fret saw and used some Branchline models Milk Van ends to complete the model. All brake detail is included as this is standard for all my wagons and now I just to add the shade roof, brake hoses and coupler release bars before they go into the paint shop.

Milk LV

Needs a coupler release

I also had 3 Lima 18ft LV's which needed to be converted to NSWGR vans as per the Branchline Modeler Article from many years ago. This was done for 2 of them but the 3rd received the Milk treatment and has had the lower panels opened out much like the Berg's LV's. This one will end up as the Farmers and Dairymen's Milk Company No5 as built by Clyde.

Dairymen No5

The buffers are trial fit

Lastly, I have 2 Redfern Models Semi louvre vans that I've been working on. Basically, I've removed the under frame and all details on these 2 models and have rebuilt them. Still some work to go with steps on the end solebar, buffers, brake hoses and some hand rails still to be added on top of all the details already added. Its been worth it as the difference between before and after is quite marked.

I'll need to find a decent set of Diamond Frame bogies

I think I'll redo the steps as I'm not happy with them

Anyway, that's about it for the Louvre Van fleet. I'm just about done with them so next will be a trip to the paint shop for these wagons and the previously completed BLV's and then I can run some typical 1930's Fruit expresses. Just need the 57 on the front!!

Sunday, May 7, 2017

There's Movement at the Station

Well, things are getting exciting with trains running on the lower deck now. I've been having some fun getting all of the kinks and bugs out of the layout with most issues corrected, bar a couple of points in the staging yard and 2 dead DCC point motors. Fortunately, the guys at DCC Concepts have a a fantastic lifetime warranty for their point motors so these have been returned and I'm waiting for the replacements to arrive. The last things I need to do is to install 2 UTP patch panels for the NCE Power Cab and install the turntables, one of which has been purchased, a 90ft table for the bottom deck. I've also still go a fair bit of fascia work to do but that will come as the scenery goes in.
One thing I've also been doing is integrating JMRI Software into the DCC system. I was surprised at how easy this was to do so the next task will be designing some control panels for the storage yard control. I've also integrated some iPhones and an iPad to act as wireless throttles and these are working a treat. My initial thoughts are that they're actually easier to use than the NCE Power Cab and much cheaper too!!! I was going to get a NCE wireless add on but the iPhones are more than adequate.

Technology

Here's a few photos of some train action at Picton.

5096

5221

CPH5

Staging Yards

The great thing is I can now get back to doing what I love the most, building rolling stock and locomotives. And, I'll be able to start on scenery and structures too so I'm thrilled to have gotten to this point after many years and many mistakes. Let the good times roll!!!